
Like it or not, those who use Windows Update to obtain and install updates, patches, and fixes will occasionally encounter issues with the Windows Update service. Sometimes, a specific update may not download. At other times, an update may fail to install. Every now and then, Windows Update (a.k.a. WU) may refuse to interact with the Windows servers from which updates come.
That’s where these steps come in. Try these troubleshooting techniques in the order outlined below to get WU operational again.
Note: Although I’ve illustrated the WU troubleshooting steps in Windows 11 here, the same techniques also work with Windows 10, with only minor variations. This story covers both current Windows OS versions quite nicely.
1. If at first you don’t succeed… try again
Though the most basic of all troubleshooting techniques for Windows Update doesn’t always work, it will help some of the time. If WU fails to work as expected, the first thing to try is to run the Windows Update request again.
For best results, restart the target PC before trying again. It’s not absolutely necessary, but it may clear some pending or transitory conditions (such as an already-downloaded update that needs to be applied) that will put Windows Update back to rights.
Here’s what to do (see Figures 1 and 2):
- Click Start, then the power button icon, then Restart.
 Ed Tittel/IDG
Figure 1: After saving all work, click Start > power button > Restart to restart the PC.
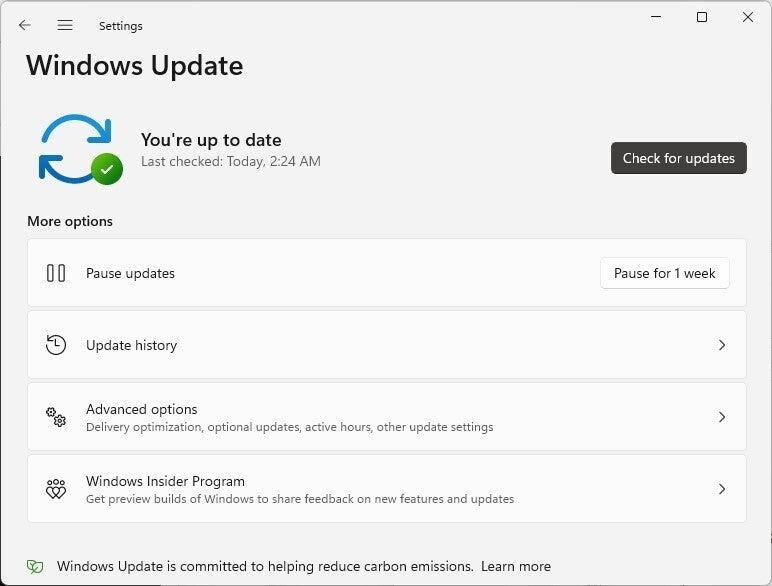
- Once the desktop appears again, click Start > Settings > Windows Update, then click the Check for updates button.
 Ed Tittel/IDG
Figure 2: Click Start > Settings > Windows Update, then click Check for updates. It may work!
In my experience, this works between 25% and 50% of the time that a problem shows up with Windows Update, and the update download and install succeeds on a second try.
If restarting the PC provides no relief, move onto the next section.
2. Try the Update troubleshooter
As the trite software saying goes, “There’s an app for that!” For common Windows problems — and WU is definitely one such beast — it’s equally valid to say, “There’s a troubleshooter for that!” These are built-in Windows mini-apps meant to diagnose and fix specific problems with Windows.
To access the right tool of that ilk, follow these steps:
- Click Start > Settings.
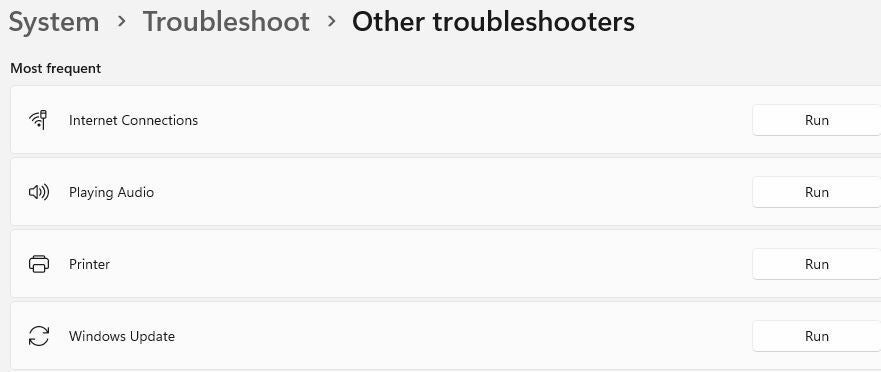
- Inside the Settings app, type the word trouble into the search bar. This produces results like those shown in Figure 3. Click Troubleshoot Other problems.
 Ed Tittel/IDG
Figure 3: Type “trouble” into Settings search, then click on Troubleshoot Other problems.
- In the resulting “Other troubleshooters” pane, Windows Update appears as the fourth item under its “Most frequent” heading, as shown in Figure 4. Click the Run button to launch that item.
 Ed Tittel/IDG
Figure 4: Click the Run button to the right of “Windows Update” to launch the WU troubleshooter. (Click image to enlarge it.)
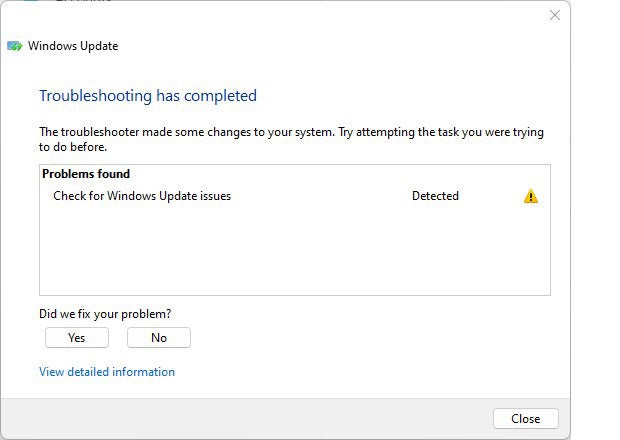
- The Windows Update troubleshooter will run inside its own pop-up window and report on the various diagnostics it runs. In about one-third to one-half of cases, it will fix what’s wrong with WU on the target PC. You’ll see a final report window that looks something like Figure 5.
 Ed Tittel/IDG
Figure 5: When the troubleshooter completes, it reports on attempted fixes. They do work, sometimes.
Once you’ve run the troubleshooter, it’s a good idea to restart the PC once more, then try to run Windows Update again. If this still doesn’t work, advance to the next section.
3. A complete WU reset maneuver
If the troubleshooter doesn’t address your issue, there is heavier artillery you can bring to bear. It’s fully described in the excellent ElevenForum.com tutorials entitled “Reset Windows Update in Windows 11” (here’s a link to its Windows 10 counterpart). This tutorial includes a download link to a batch file that turns off all WU related services, then resets all Windows Update components and policies, then restarts all the services it turns off. It’s completely automated, around a batch file named:
Reset_Reregister_Windows_Update_Components_for_Windows11.bat
Once you grab the file, you’ll need to open an administrative command prompt or PowerShell session. (Type either cmd or powershell in the Windows search box, right-click Command Prompt or Windows PowerShell in the list of results, select Run as administrator, and enter the password if prompted.) Then navigate to the folder where the aforenamed batch file resides. Cut and paste the file name into the command line, and then hit the Enter key to run it. (It’s so handy, I keep it on the desktop on my Windows 10 and 11 PCs, as you’ll see below.) That’s all there is to it, as shown in Figure 6.
 Ed Tittel/IDG
Figure 6: If you list the directory (type “dir”) in the folder with the batch file, you can easily cut and paste that filename to the command line, then hit Enter to run it. (Click image to enlarge it.)
This batch file takes a while to run and involves checking and stopping WU services (bits, wuauserv, and cryptsvc). It then flushes the DNS cache, clears pending update requests, deletes temporary files and folders related to WU downloads, and resets Windows Update policies in the registry. Then it restarts what it stopped, and ends by offering a Restart button. Use it, because the PC must restart for all these changes to take effect.
I’ve used this batch file on most or all of my Windows 10 and 11 PCs (and 7, 8, and 8.1 PCs before that), and it’s worked in every single case except one to put WU back in action. And on the machine where it failed, it turned out I had a hardware problem (a failing SSD) that prevented the download files from being stored properly.
IMO, the reset-reregister batch file is something of a silver bullet for WU problems. Thus, if you don’t mind waiting the 5-10 minutes it can take to work through its processes (under 2 minutes on my 8th-gen i7 Lenovo X12 hybrid tablet), it’s always worth a try.
After I ran it on my test PC, it cleared the error condition the troubleshooter found but couldn’t fix, and successfully downloaded and installed a pending Cumulative Update (CU) — namely KB5016159, which takes the PC to Build 25145.1011.
If the silver bullet fails, then what?
On the lone occasion where this happened to me, I had to take my affected PC to the shop, where they were able to detect and diagnose a failing drive (SSD) that I did not catch on my own. Once that component was replaced, the system returned to normal working order.
Before you take a PC that gets to this stage to the shop, I’d recommend trying an in-place repair install (described in “How to fix Windows 10 with an in-place upgrade install”). And if that fails, try a clean OS install next (described in “Windows 10 recovery, revisited: The new way to perform a clean install”). Only then should a trip to the shop be needed. Hopefully, you’ll never get that far!
Additional reading on WU errors
Microsoft Docs offers a helpful document on troubleshooting Windows Update. It’s part of a general Deploy and Update Windows Client guide that includes the following valuable sections:
IT professionals seeking to resolve WU issues and more serious Windows enthusiasts will find these added details helpful and illuminating. Cheers!
