
Since announcing its Loop collaboration app in late 2021, Microsoft has been rolling out some of its features to Microsoft 365 apps like Teams and Outlook. But the Loop app itself has been in private beta. That changed in March when the company released the Loop app in public preview.
Loop is an online app that you use through a web browser. It’s also available as a mobile app for Android or iOS, with more limited functionality. While anyone with a Microsoft account can sign up to try out Loop (at least for now), some features may not be available without a Microsoft 365 subscription. Also note that if you have a work or school Microsoft account, your administrator will need to enable the Loop app for your organization before you can use it.
Let’s take a look at the Loop app and how you can use it to collaborate with your team. Keep in mind that the preview versions of the web and mobile apps may be unstable, and features may change before the apps are officially released.
What is Microsoft Loop?
Microsoft Loop is a new productivity app that lets Microsoft 365 subscribers share portable content snippets and manage them in a collaborative space. Loop consists of three main elements: Loop components, Loop pages, and Loop workspaces.
Loop components are portable text cards or snippets — lists, tables, paragraphs, or other formats — that can be shared with others for collaboration. They can be embedded in multiple Microsoft 365 apps such as Teams and Outlook, and any changes made to a component in one location immediately appears in all other locations. That way everyone always has the most current version of the component no matter which app they’re working in.
Loop pages are shared digital canvases that let you add Loop components and other elements such as text, images, and related information. Your co-workers can collaborate with you on pages that you’ve shared with them, and all changes are synced in real time.
Loop workspaces are virtual spaces where you can group together related pages. You can share a workspace with your co-workers so that they can collaborate with you on the pages it contains. For instance, you might want to create a workspace for a project your team is working on. This project workspace could include multiple pages for the project, such as a project planning page, a project brief, meeting notes, an issue tracker, and so on.
We have a separate story that goes into detail about Loop components and how to use them in Microsoft 365 apps. In this story we’ll focus on setting up pages and workspaces in the Loop app. Here’s how to get started using the app:
- Create a workspace.
- Add one or more pages to your workspace.
- Add text and other elements, including Loop components, to a page.
- Share a page or workspace with your co-workers so they can collaborate with you on it.
Creating a Loop workspace
From the home page of the Loop web app, click the + button at the upper right. On the panel that opens, type in a name for your new workspace.
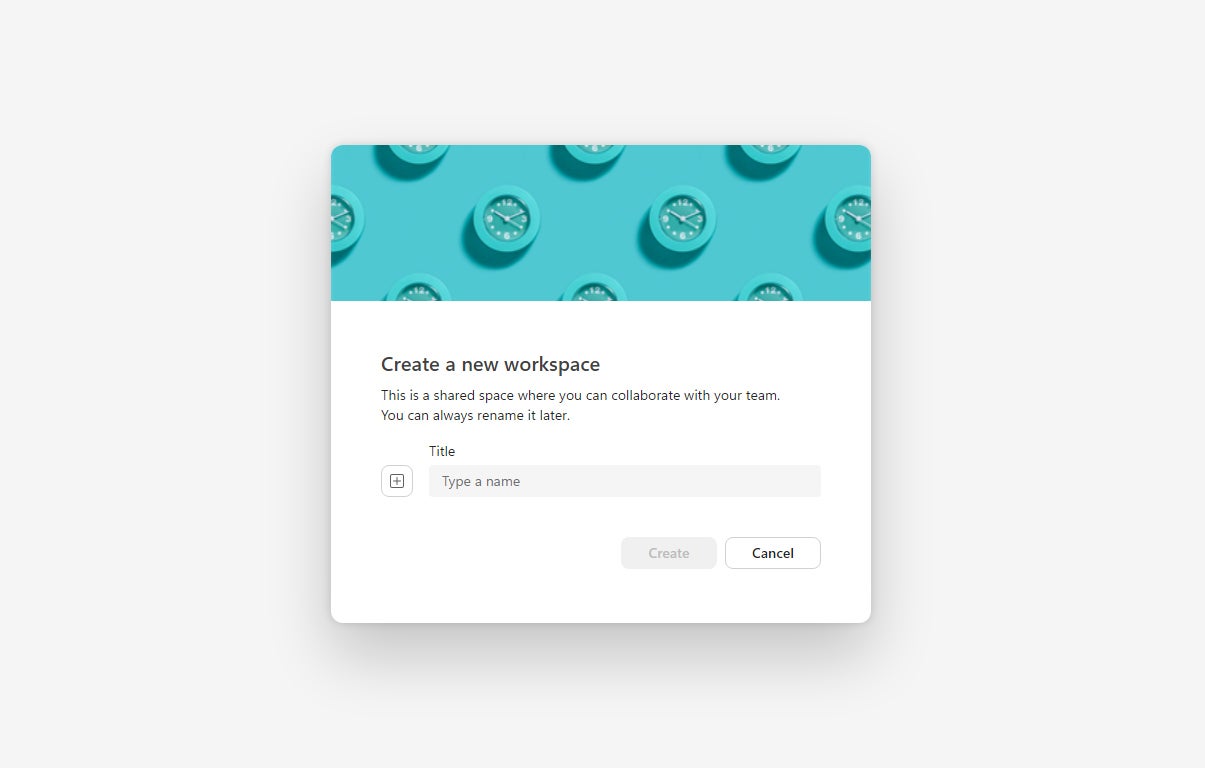 IDG
IDGCreating a new Loop workspace. (Click image to enlarge it.)
You can change the cover image for the workspace by clicking it and selecting another one from a gallery of images and colors. Also, you can select an emoticon to serve as an icon for your workspace by clicking the square + button to the left of the workspace title entry box.
When you’ve typed in a name and made your other selections, click Create.
Creating Loop pages
After you create your workspace, you’re taken to its first page. In the “Untitled page” line, type in a name for this page. You can select an emoticon to serve as an icon for your page by clicking Add icon. And you can add a cover image for the page by clicking Add cover and selecting one from a gallery of images and colors.
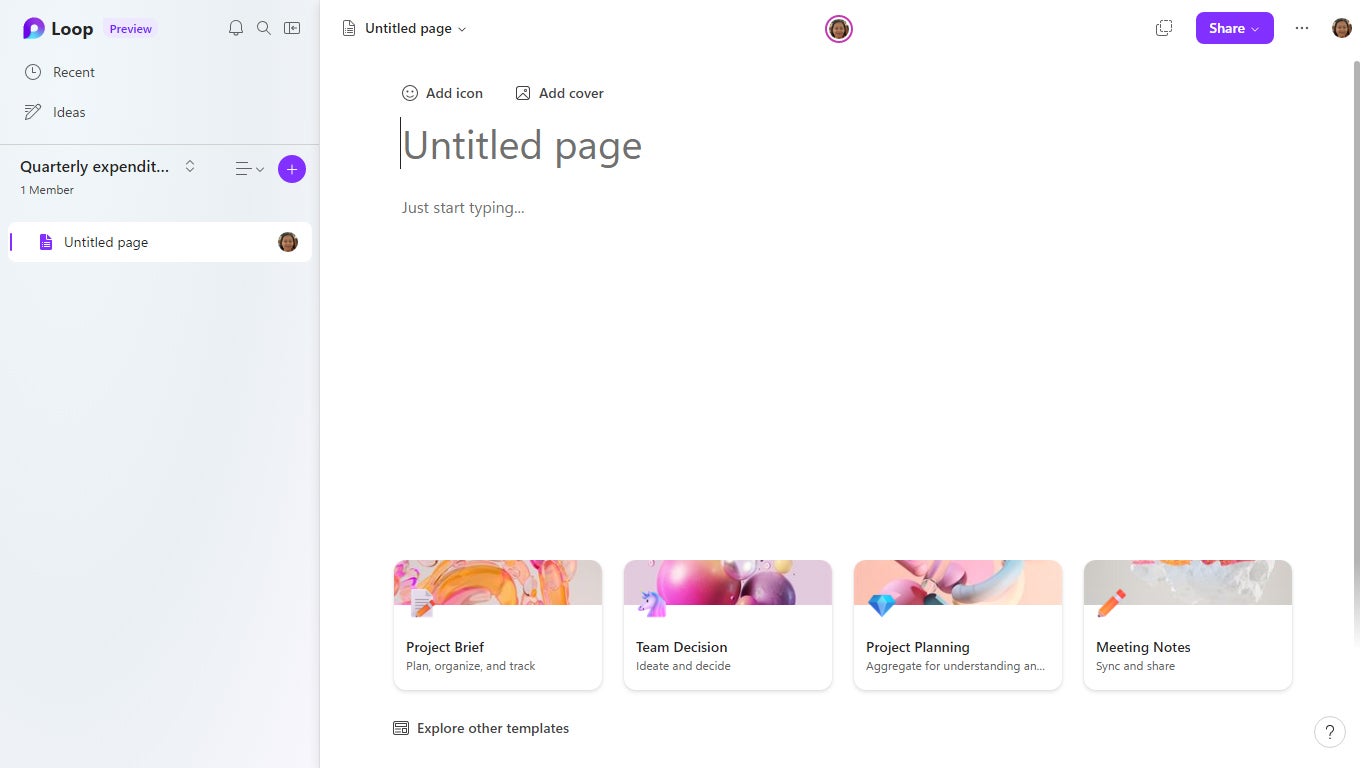 IDG
IDGStarting a new page in a Loop workspace. (Click image to enlarge it.)
Add text and other elements: In the “Just start typing…” area, type in text or type / to see a list of elements you can add to the page, including headings, tables, checklists, progress trackers, images, and more. (See “How to use Microsoft Loop in Outlook and Teams“ for more details about the types of Loop elements available.) To tag a co-worker, type @, start typing their name, and then select their name from the results that appear.
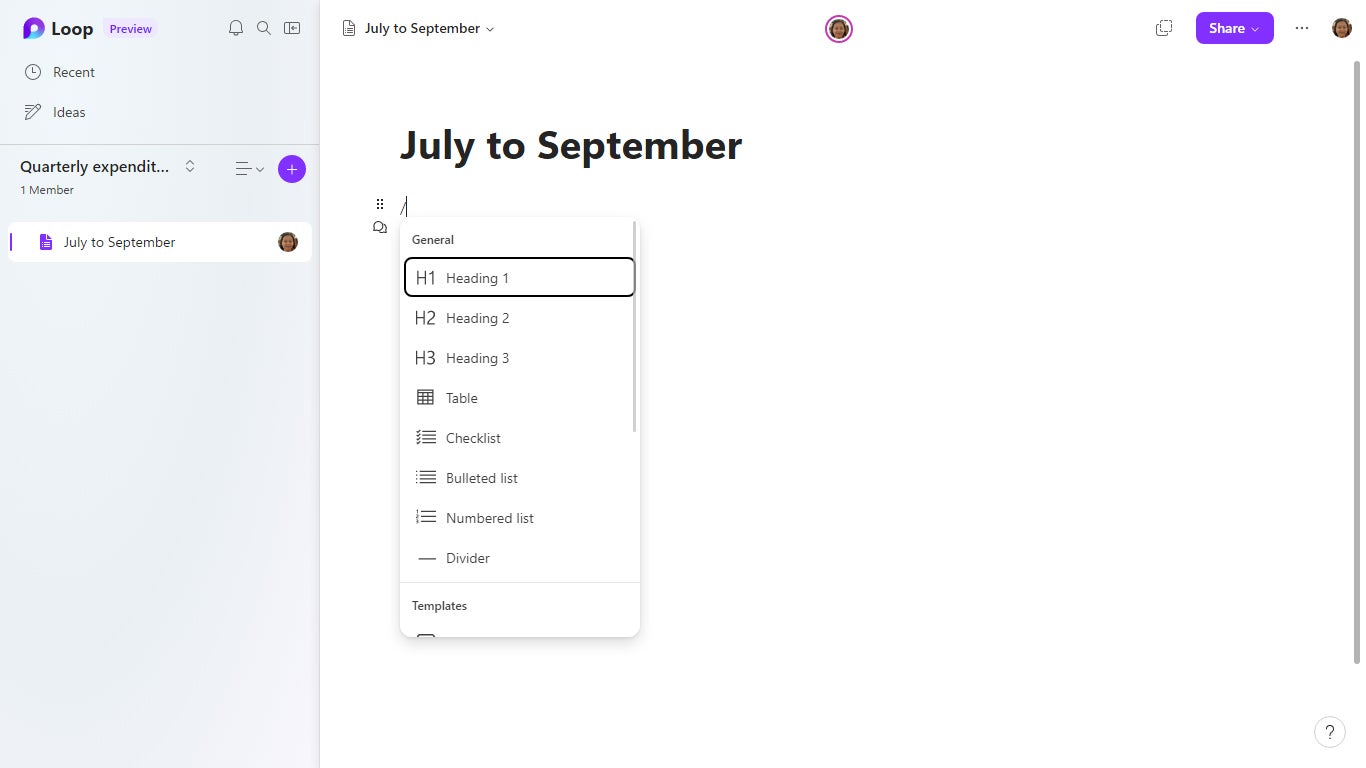 IDG
IDGType / to see a list of elements you can add to a page. (Click image to enlarge it.)
Use a template: Along the bottom of any new page are thumbnails for templates such as Project Brief, Team Decision, Meeting Notes, and so on. Instead of starting a page from scratch, you can select one of these templates to apply a pre-designed layout to your page. Each template contains several relevant elements that you can customize for your needs, and you can always add more elements and text as needed. Click Explore other templates below the thumbnails to open a gallery of more layouts to choose from.
Turn an element into a Loop component: You can select any element on your page to turn into a Loop component that can be shared and edited in other Microsoft 365 apps. For example, you can turn a table element on your page into a Loop component, then embed the table in another M365 app, such as in an Outlook email or Teams chat, with any changes appearing in real time wherever the component is being viewed.
Click the element to select it, then click the six-dot icon that appears to the left or upper left of the element. From the menu that opens, select Create Loop component.
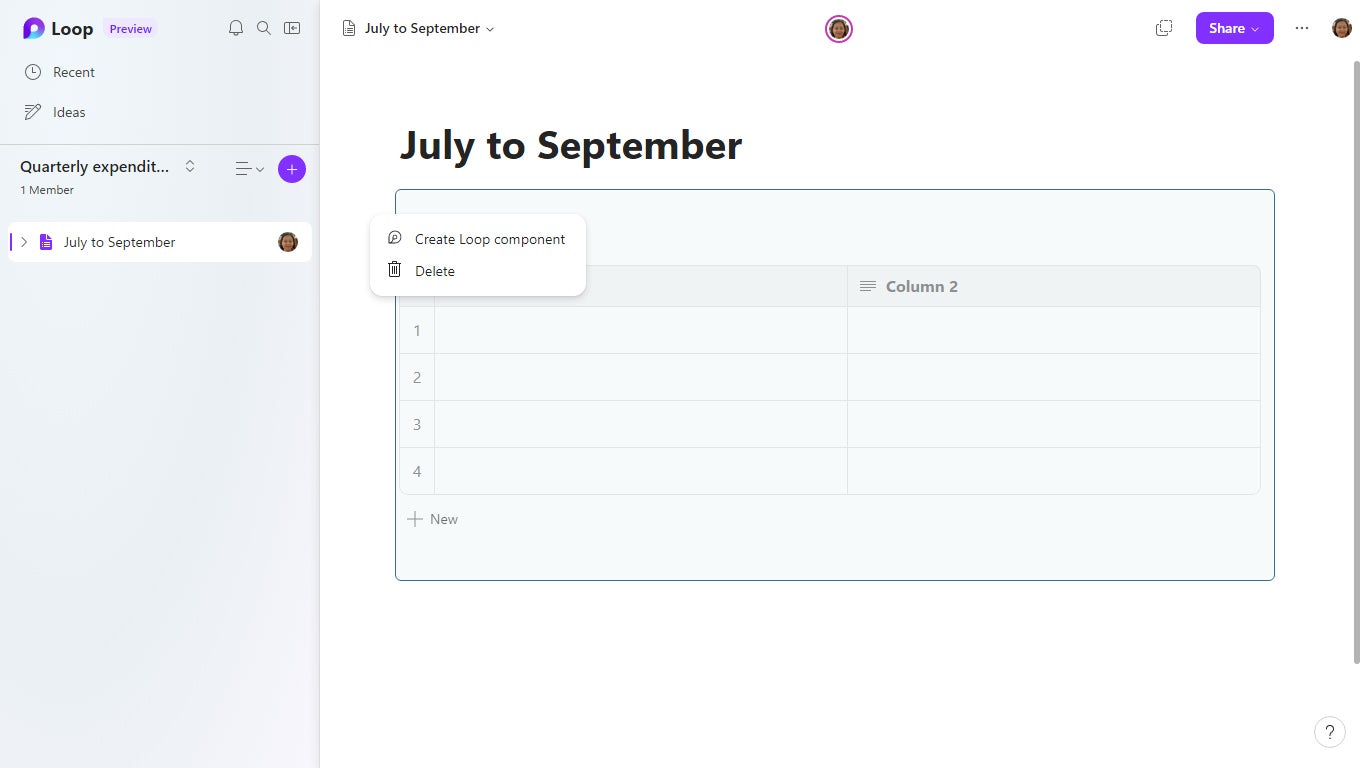 IDG
IDGTurning a page element into a Loop component. (Click image to enlarge it.)
The element will have a line drawn around it with the Loop logo at its upper left to indicate that it is now a Loop component. To share the component in another app, select the Copy component icon (two overlapping squares) at the upper right of the component. You can then paste the component link into an Outlook email or Teams chat.
As of this writing, only Outlook, Teams chat, and Whiteboard support Loop components. It’s expected that Loop will soon be implemented into Teams channels, OneNote, and Word for the web.
Adding more pages and subpages
You can keep adding pages to your workspace.
Add another page: In the sidebar along the left, click the + button, and from the menu that opens, select New page.
Add a subpage: You can add a page that is branched below another page. In the sidebar along the left, click the three-dot icon to the right of the page that you want to add a subpage below. Then, from the menu that opens, select New subpage.
 IDG
IDGYou can add subpages (and subsubpages) as needed. (Click image to enlarge it.)
Creating pages in the Ideas section
Toward the top of the sidebar along the left, there’s a section titled “Ideas” where you can work on a page before you add it to a workspace. This can come in handy if you want to add a page to a workspace that you’re already be sharing with co-workers, but you’re not ready for your co-workers to see the page yet.
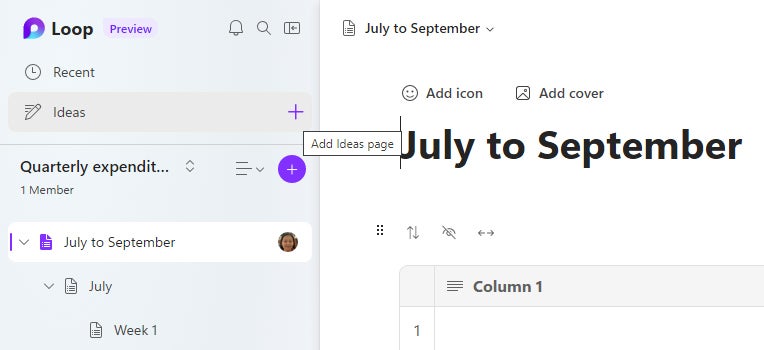
Create a page in Ideas: Move the pointer over Ideas in the sidebar and click the + that appears to its right.
 IDG
IDGCreating a page in Ideas. (Click image to enlarge it.)
Screenshot: microsoft-loop-06-add-ideas-page.jpg
Caption: Creating a page in Ideas.
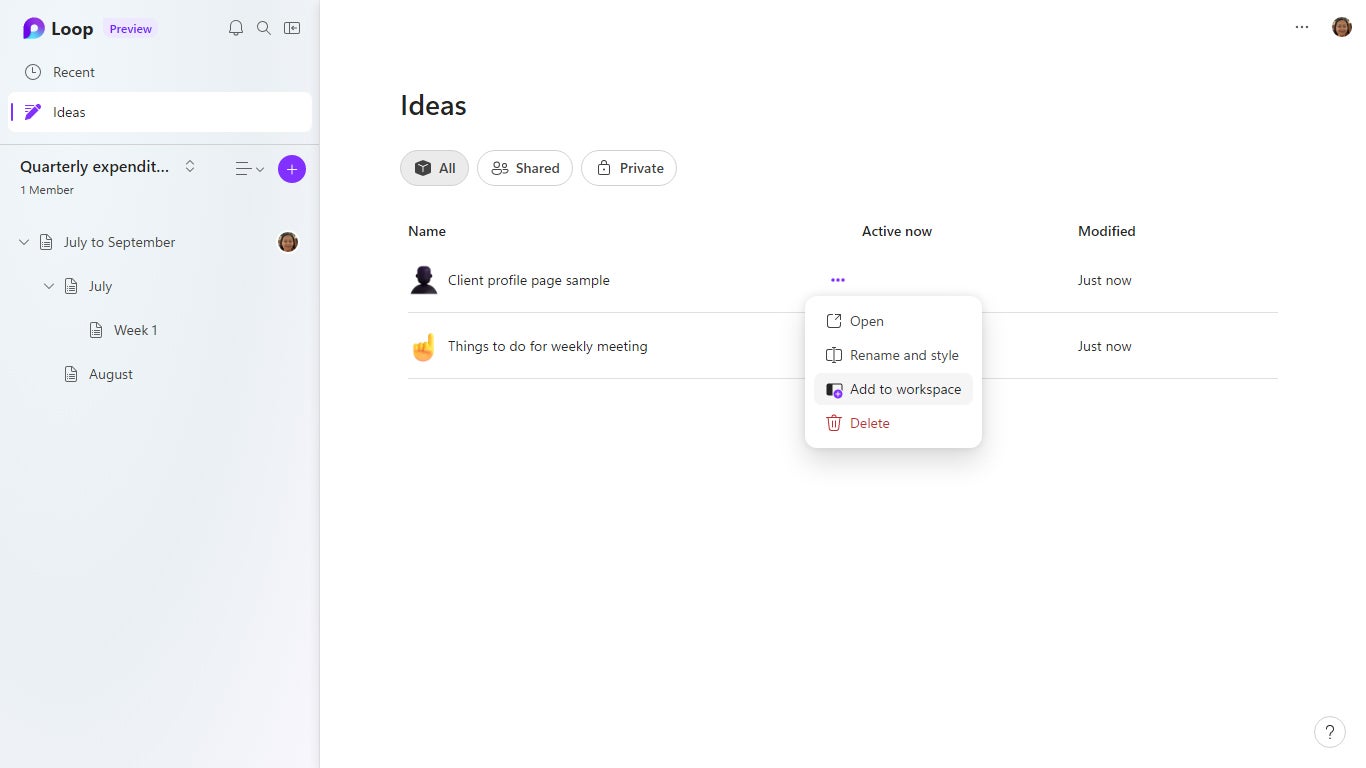
Add an Ideas page to a workspace: Click Ideas in the sidebar. A list of the pages in the Ideas section opens in the main window. Move the pointer over the page that you want to add to a workspace, click the three-dot icon, and from the menu that opens, select Add to workspace.
On the panel that opens, click the name of the workspace where you want to add the page. The page will be appended as the last page in the workspace.
 IDG
IDGAdding an Ideas page to a Loop workspace. (Click image to enlarge it.)
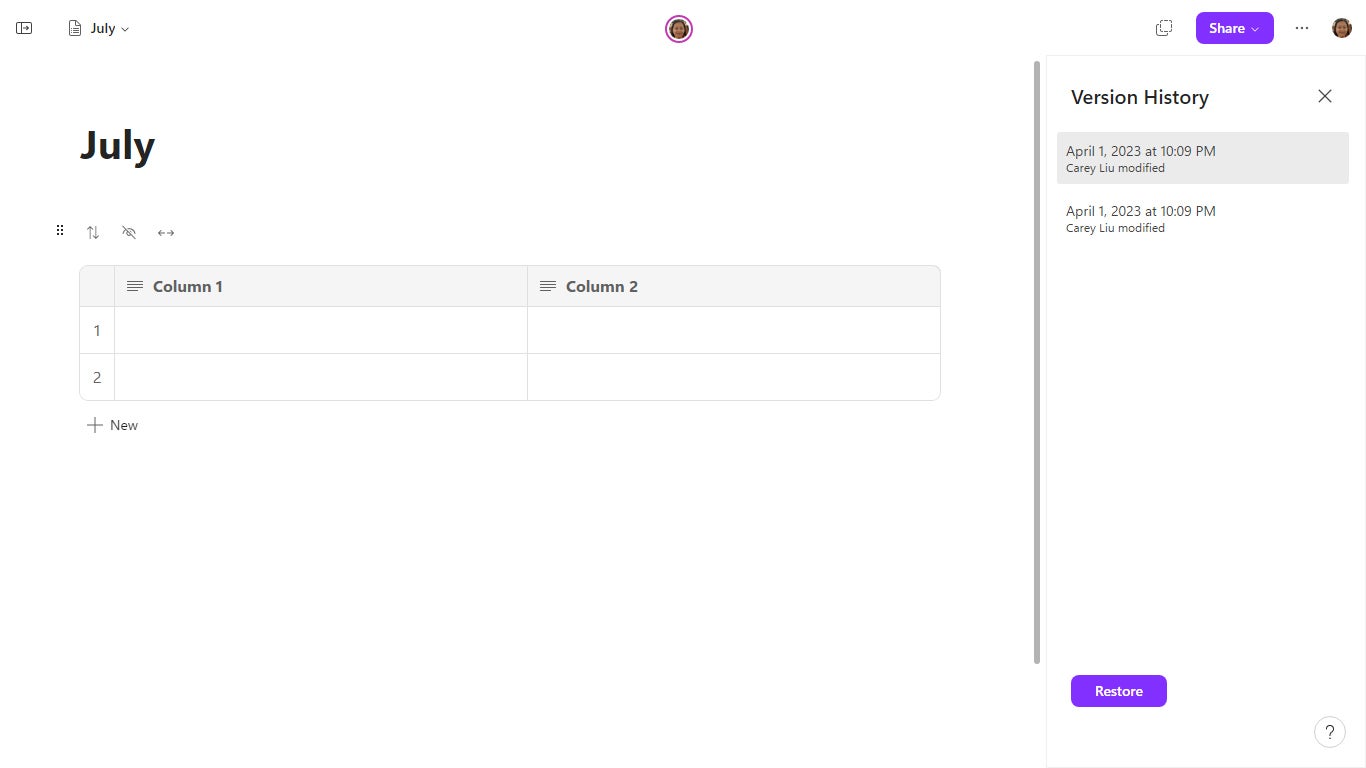
Restoring a previous version of a page
The Loop web app archives multiple versions of a page as you and your collaborators make changes to it. If you decide that a page was better before certain changes were made to it, you can view the previous versions and restore one of them to your workspace.
With the page open, click the three-dot icon at the upper right. From the menu that opens, select Version History. In the sidebar along the right, click the date/time of the previous version that you want to view. That version appears in the main window. Click the Restore button to replace the page with this previous version.
 IDG
IDGYou can view and restore earlier versions of a page. (Click image to enlarge it.)
Sharing a Loop workspace or page
In the Loop app, you can invite co-workers to collaborate with you on a workspace or an individual page. If you share a workspace, each person you invite can view and make changes to any page in that workspace. If you share a page, collaborators will be able to view and edit only that page.
Sharing a workspace
There are two ways to share a workspace:
With any page in that workspace open in the main window: Click the Share button at the upper right. From the menu that opens, select Workspace.
From the home page of the Loop web app: Move the pointer over the workspace you want to share and click the three-dot icon that appears. From the menu that opens, click Members.
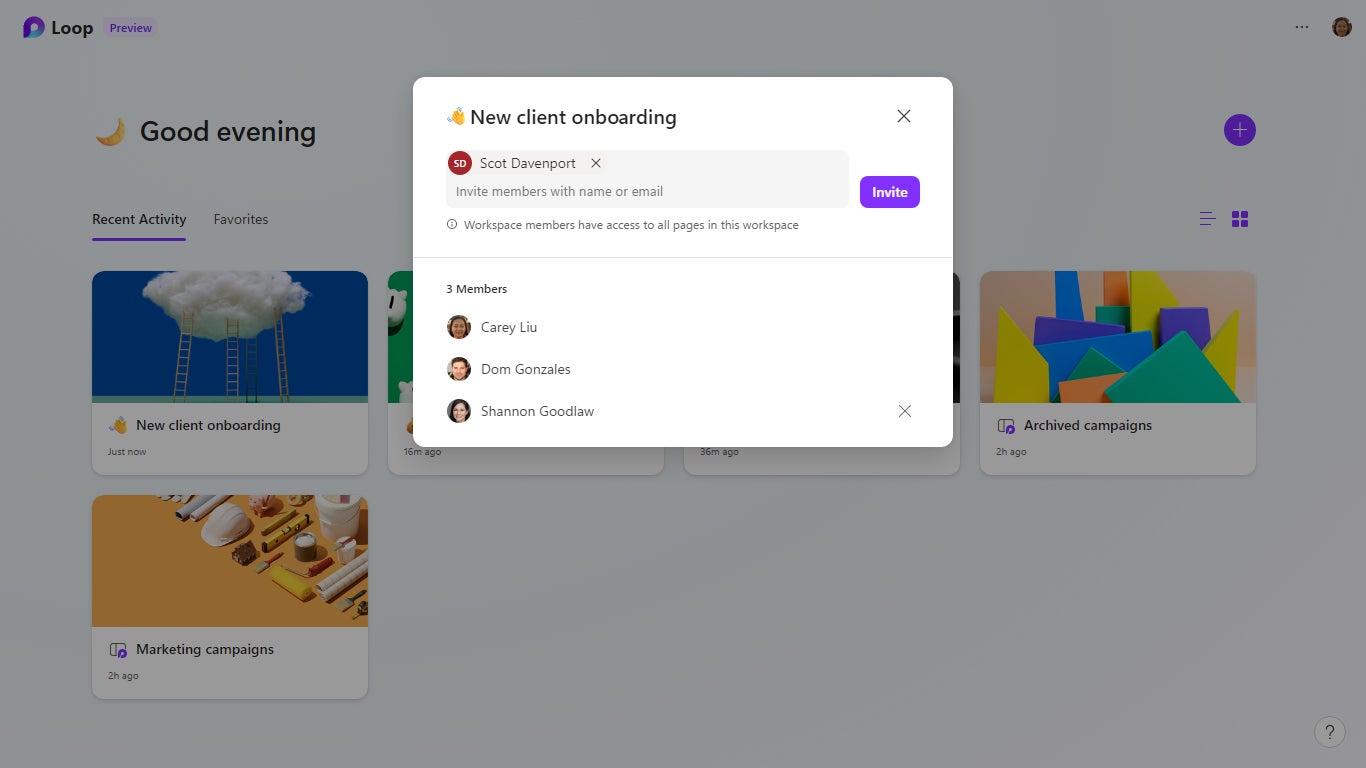 IDG
IDGInviting collaborators to a Loop workspace. (Click image to enlarge it.)
Either way, a panel opens where you can type in the email addresses or names of people in your Microsoft account contacts whom you want to collaborate with. When you’ve finished adding names, click the Invite button. They will be emailed a link to access the workspace.
Sharing a page
You can share a page that’s in a workspace or in the Ideas section via one of two types of links:
- As a web link: When you or someone you invite clicks this link, the page opens in a web browser.
- As a Loop component: When you or someone you invite pastes this link inside an Outlook email or Teams chat, the page is embedded in it.
You can share a page from Loop’s main window or from the sidebar along the left.
With the page open in the main window: To share the page as a web link, click the Share button at the upper right and from the menu that opens, select Page link. On the panel that opens, click the Copy button to copy the link, which you can paste into an email or chat.
To share the page as a Loop component, click Share > Loop component or click the dual-square icon to the left of the Share button. On the panel that opens, click the Copy button to copy the component link, which you can paste into an Outlook message or Teams chat to embed the page there.
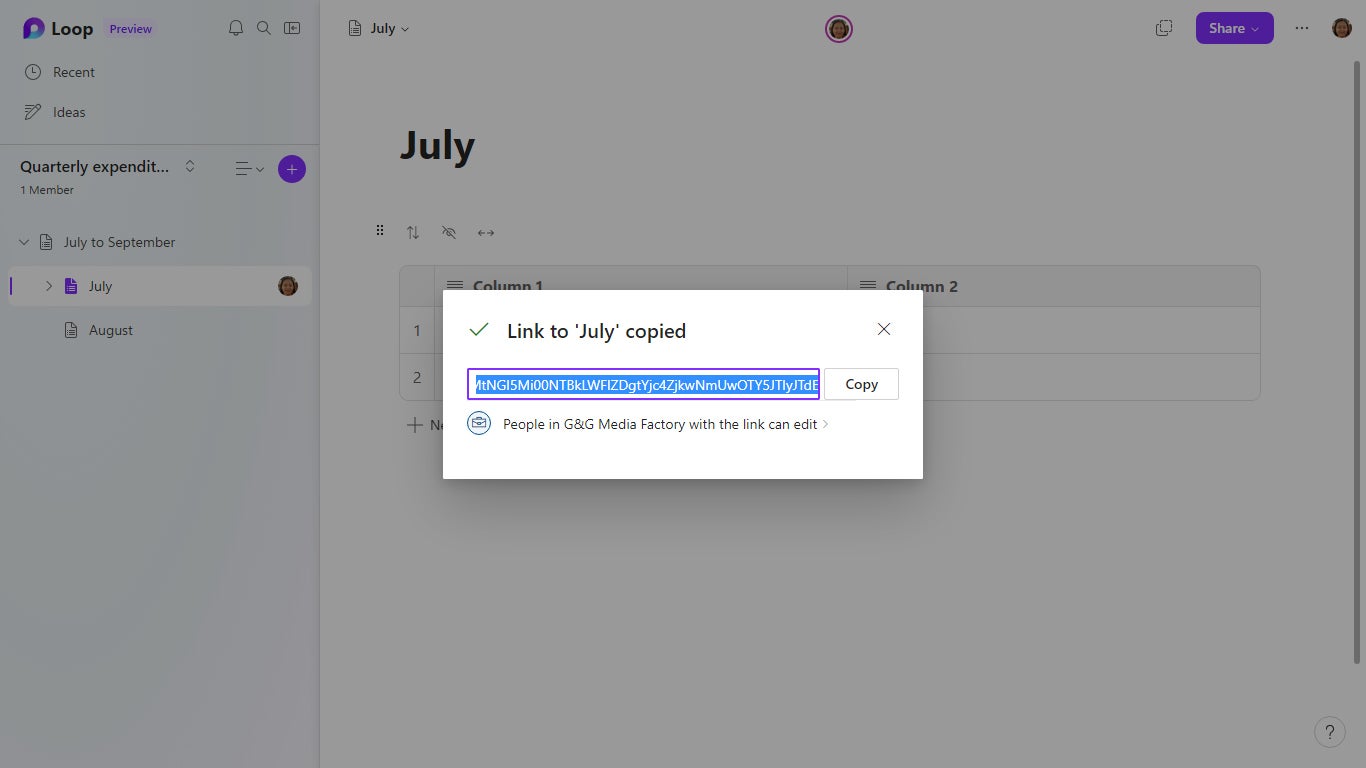 IDG
IDGCopying the link to a shared Loop page. (Click image to enlarge it.)
From the left sidebar: You can also share a page without having to open it in the main window. In the sidebar along the left, click the three-dot icon to the right of the page that you want to share. From the menu that opens, click Share page link or Share Loop component.
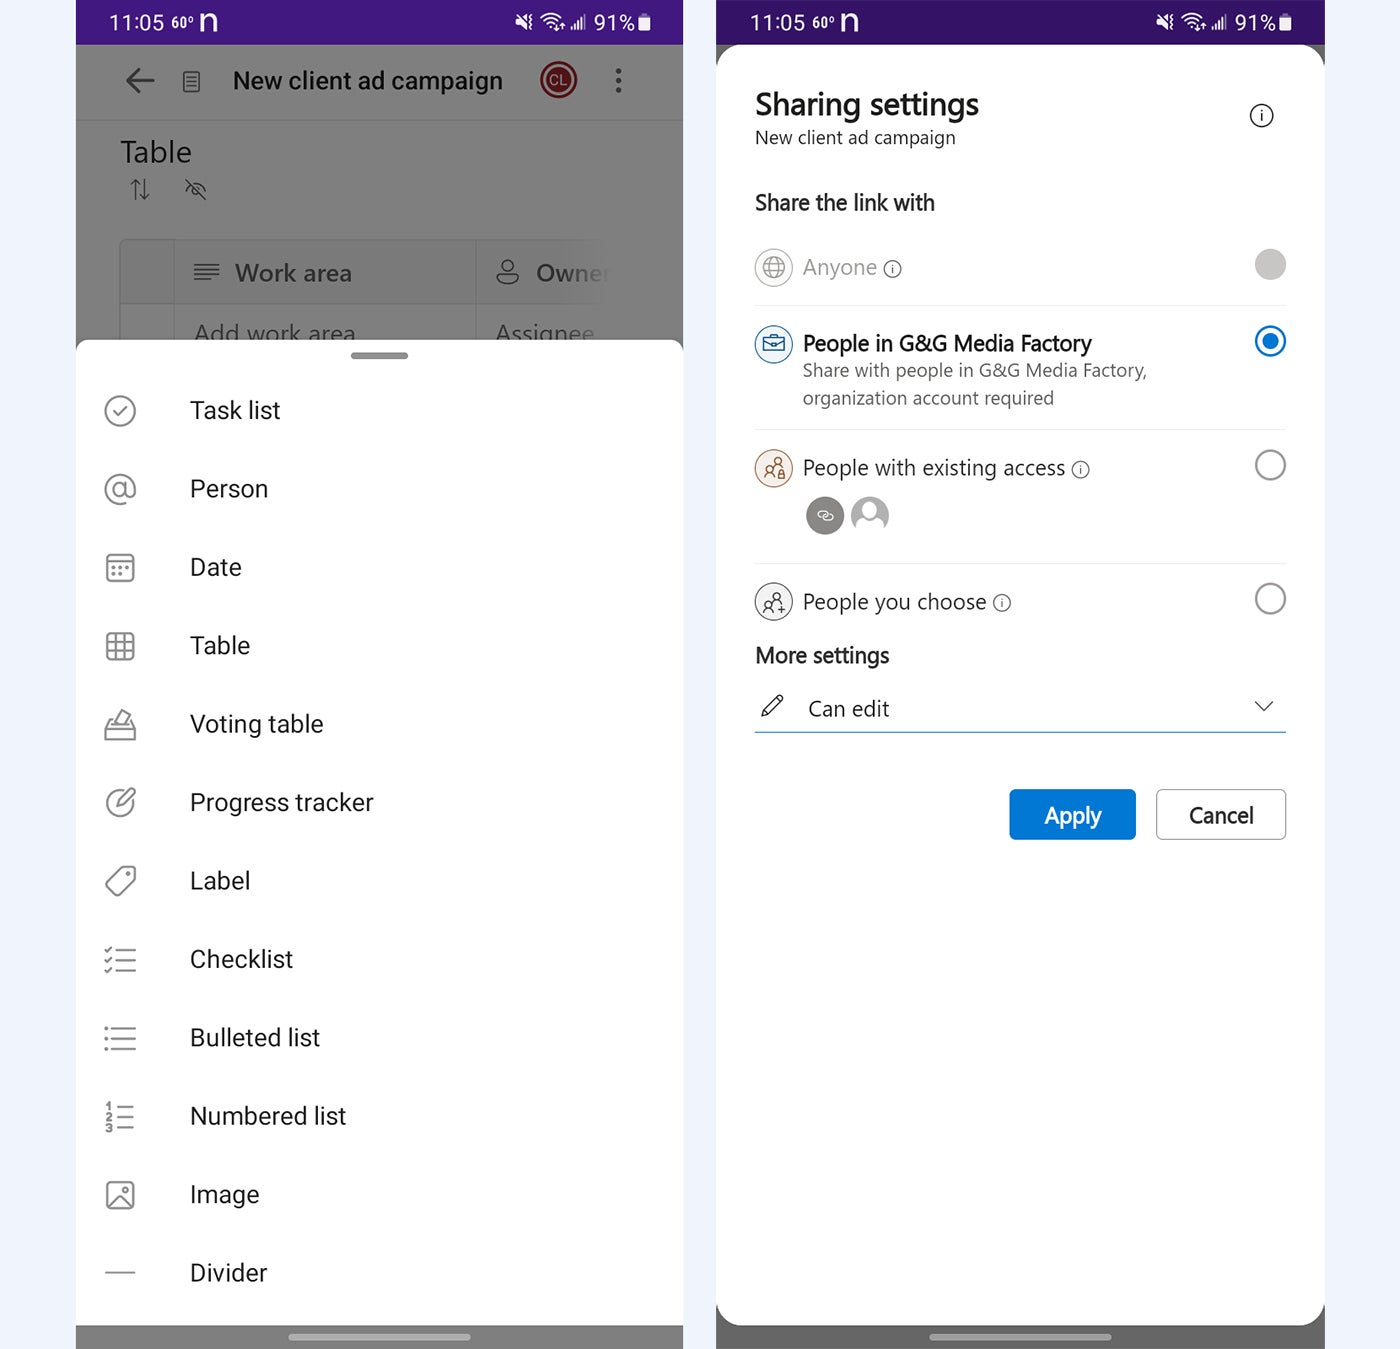
Change a page’s sharing permissions: Depending on the type of Microsoft account you’re using and how the administrator of your work or school account have set sharing permissions, access to the page you’re sharing may be open to anyone with the link or restricted to people in your organization. By default, whoever has access will be able to make changes to your page. You can change who has access and whether they can edit or only view the page.
On the panel that appears when you select Share > Page link or Share > Loop component, don’t click the Copy button right away. Instead, click the text underneath the sharing link: it will likely say Anyone with the link can edit or People in [your organization] with the link can edit. This opens the “Sharing settings” panel.
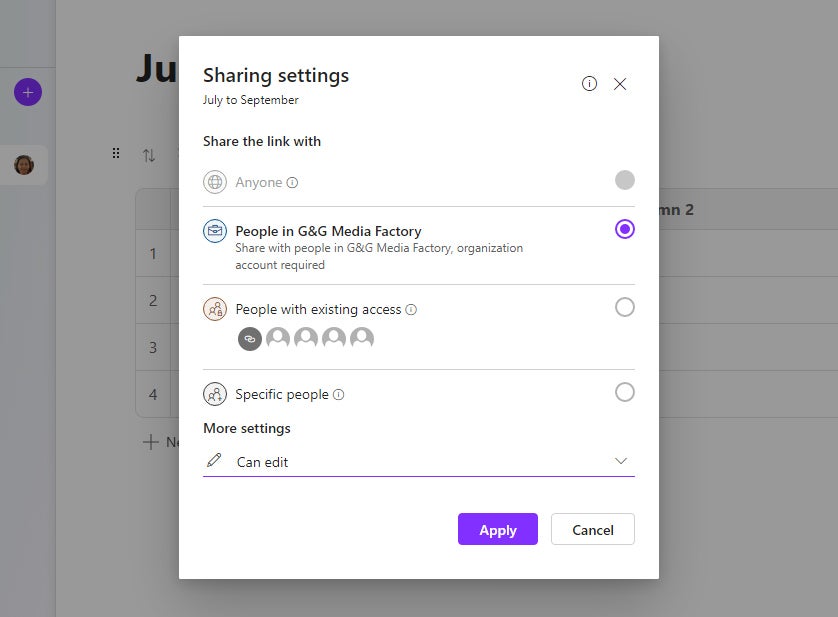 IDG
IDGChanging who has access to a Loop page. (Click image to enlarge it.)
Depending on your account and the permissions set by your admin, you may have various sharing options available: Anyone, People in [your organization], People with existing access, or Specific people. People with existing access are those you’ve tagged in the page with the @ command. If you choose Specific people, you can enter email addresses or names of contacts you want to invite to collaborate on the page.
To change the permissions so that anyone with access to the page can view it but not edit it: In the “Sharing settings” panel under “More settings,” click Can edit, and from the drop-down menu that opens, select Can view.
And again depending on your type of account and how it’s configured, there may be two more settings that you can select. First, you can set an expiration date for the link. It will no longer work after a date that you choose. And you can set a password — when someone clicks the web link to your page or pastes the Loop component link for it, they’ll have to enter this password first.
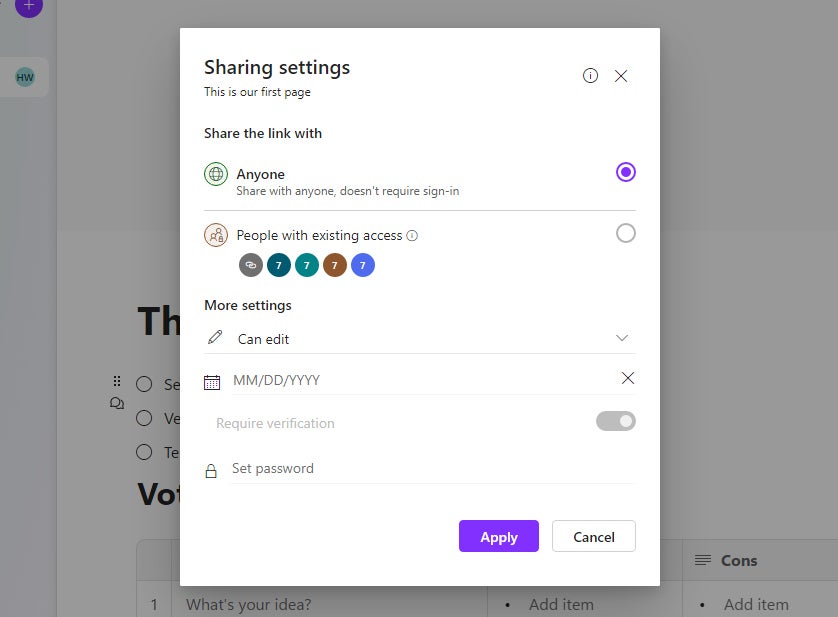 IDG
IDGSome users can set an expiration date and password for access to a page. (Click image to enlarge it.)
After you make your selections, click the Apply button toward the bottom. The customized link to your page will be generated for copying.
Managing your Loop workspaces and pages
It’s easy to create new workspaces, navigate among Loop workspaces and pages, and perform other actions like renaming or deleting pages and workspaces.
Create a new workspace: With a page open in the main window, click the name of your workspace in the sidebar along the left. From the menu that opens, select New workspace.
 IDG
IDGYou can easily switch to another workspace or create a new one. (Click image to enlarge it.)
Screenshot: microsoft-loop-13-switch-workspace.jpg
Caption: You can easily switch to another workspace or create a new one.
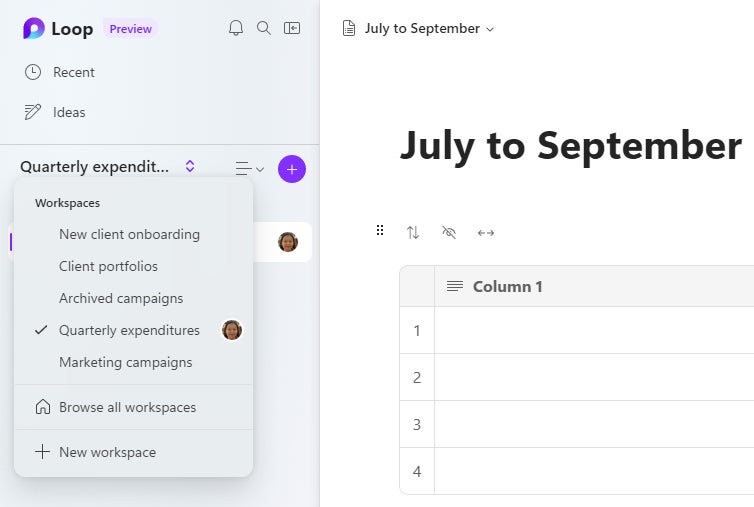
Navigate to a different workspace: With a page open in the main window, click the name of your workspace in the left sidebar. From the menu that opens, click the name of another workspace or select Browse all workspaces to go to the Loop home page and select another workspace there.
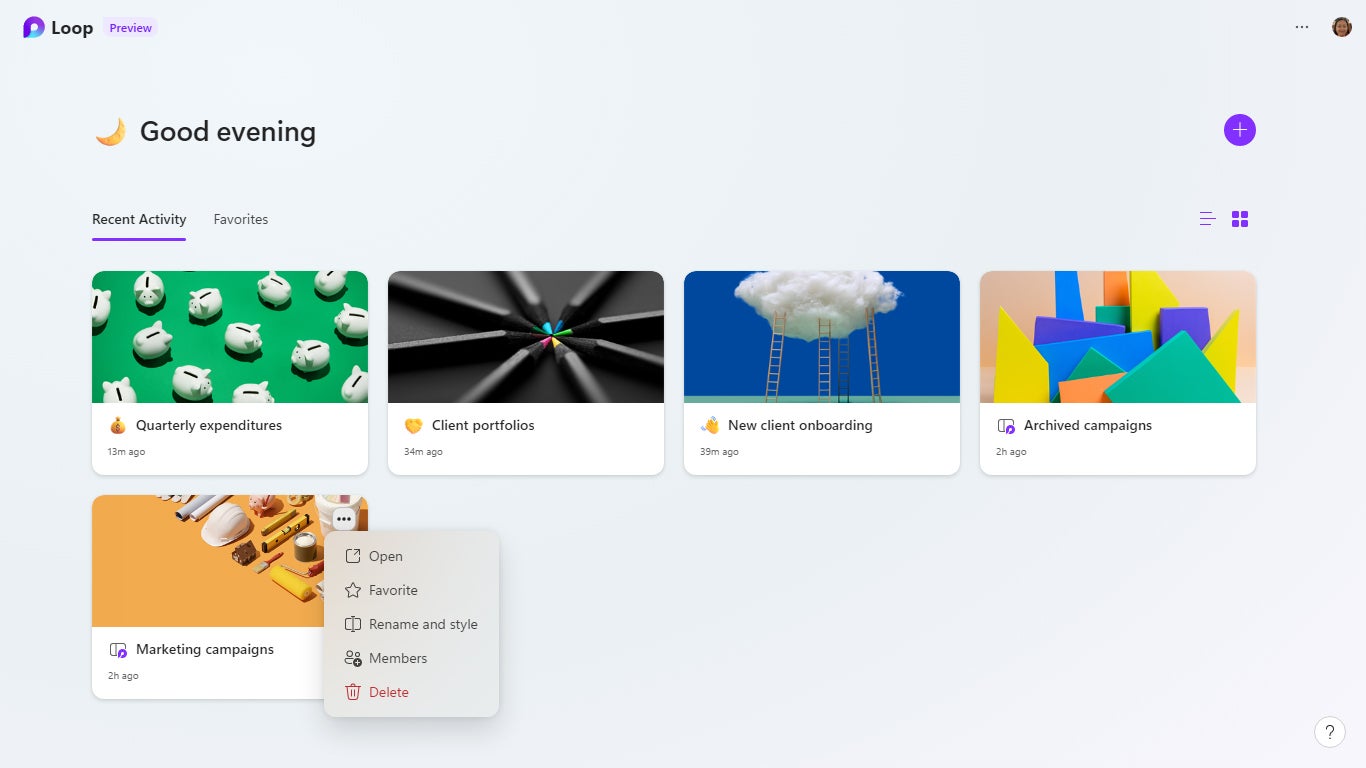
Rename or delete a workspace: Go to the home page of the Loop web app, move the pointer over a workspace, and click the three-dot icon that appears. From the menu that opens, click Rename and style or Delete.
 IDG
IDGClick the three-dot icon for a workspace to take actions such as opening it, renaming it, or deleting it. (Click image to enlarge it.)
Change the order of pages in a workspace: In the left sidebar, move the pointer over a page that you want to move. Click-and-hold the page, drag it up or down, and let it go where you want it to be set along your list of pages.
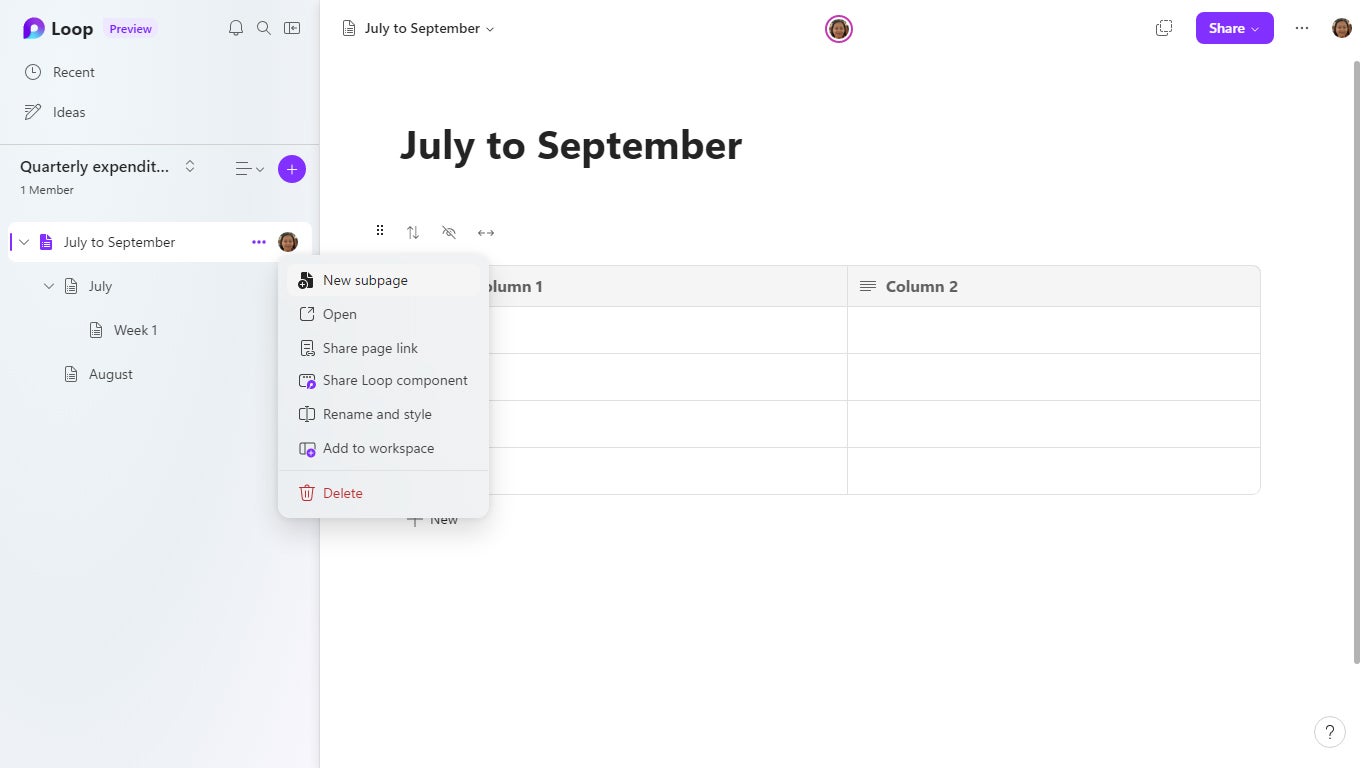
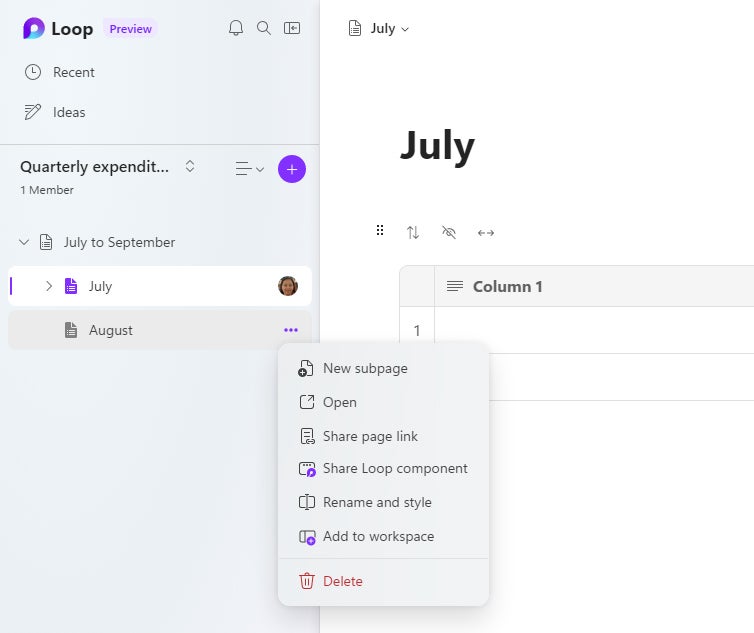
Rename or delete a page: In the left sidebar, move the pointer over a page and click the three-dot icon that appears. From the menu that opens, click Rename and style or Delete.
 IDG
IDGSeveral commands are available when you click the three-dot icon to the right of a page. (Click image to enlarge it.)
Copy a page to another workspace: In the left sidebar, move the pointer over a page and click the three-dot icon that appears. From the menu that opens, click Add to workspace, then select the name of another workspace that you’ve already created. A copy of this page will be added to that workspace.
Using the Loop mobile app
The Microsoft Loop mobile app (for Android and iOS devices) is in preview release as of this writing. It lets you view Loop pages that you created in the web app as well as Loop components that you created in Microsoft 365 apps.
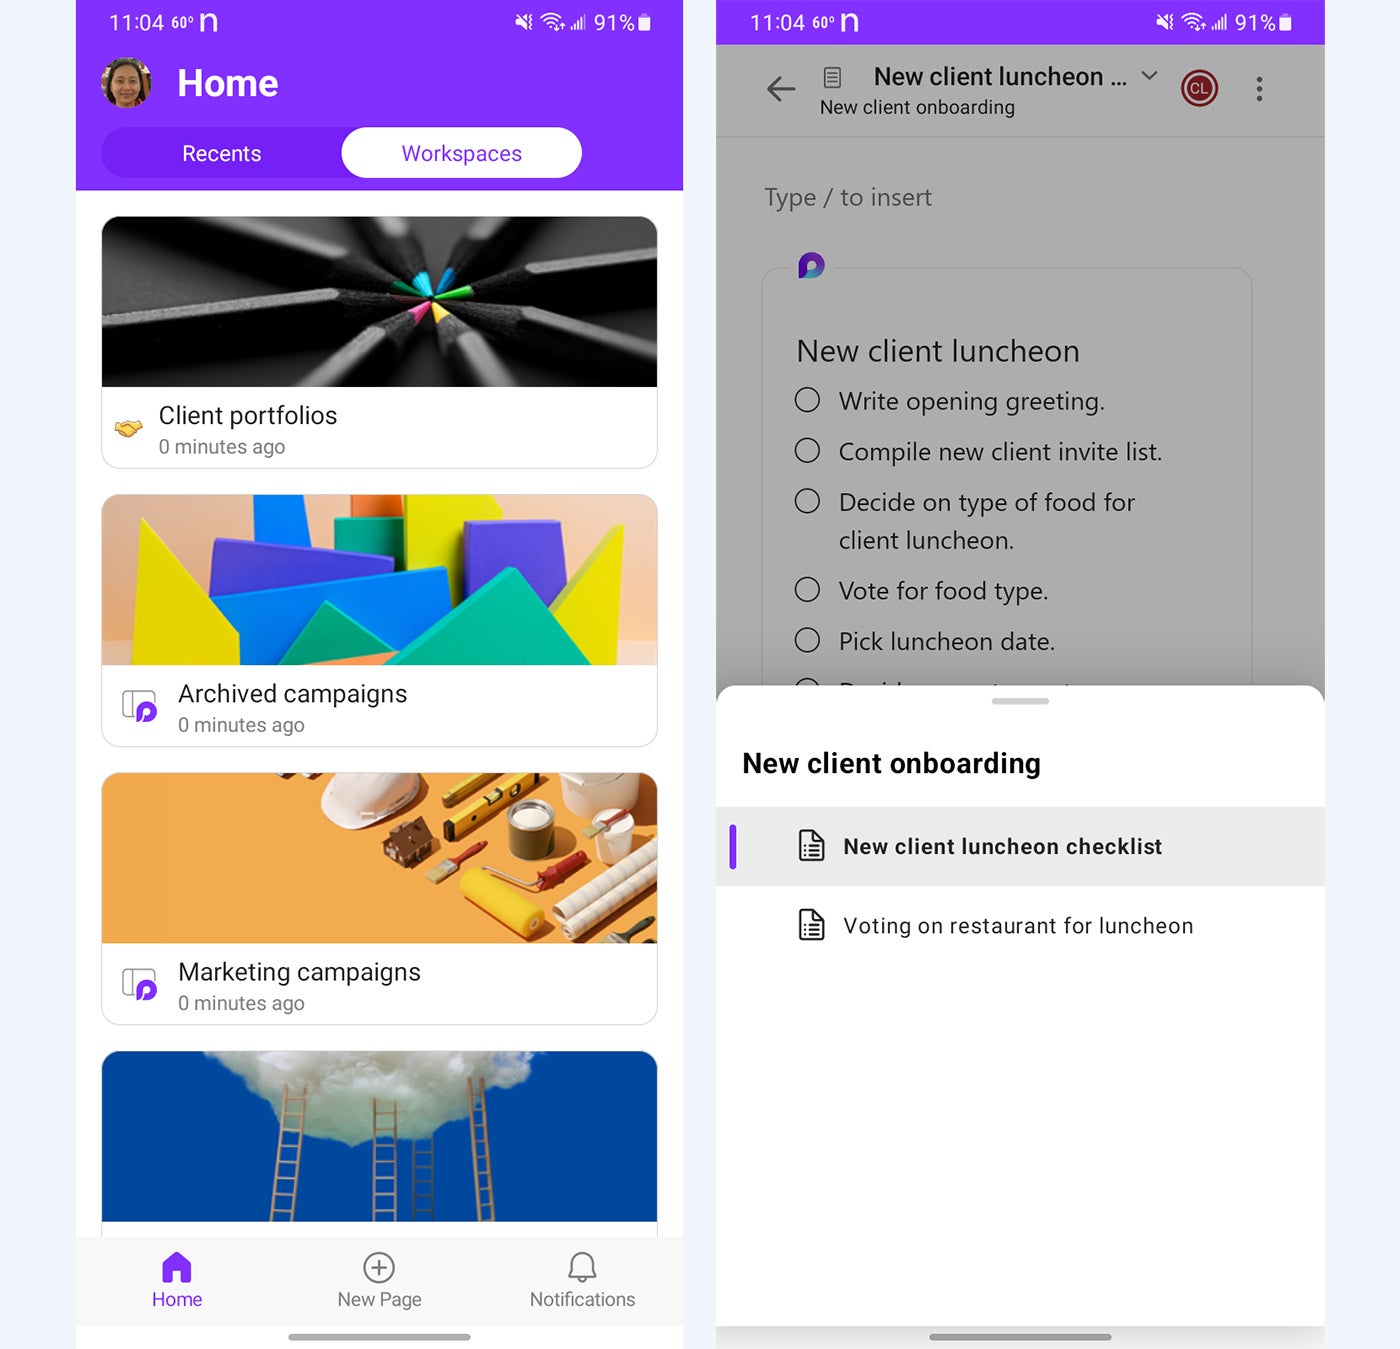
You can open a workspace that you created in the web app, and view and edit the pages in it. But the mobile app doesn’t have the ability to let you create a workspace or add pages to a workspace.
 IDG
IDGYou can view workspaces and edit pages in them via the mobile app. (Click image to enlarge it.)
You can also create new pages using the mobile app. All the elements described above that you can add to a Loop page using the web app are also available in the mobile app. You can share your pages and set permissions via the mobile app as well.
 IDG
IDGYou can create and share pages via the mobile app. (Click image to enlarge it.)
There are additional limitations to the mobile app that vary depending on whether you’re using the Android or iOS app. See Microsoft’s Loop mobile FAQ for details.
