
Word has always been the workhorse app of the Microsoft Office suite. Nearly everyone who uses Office ends up using Word at some point, whether it be for writing memos, typing up agendas, creating reports, crafting business correspondence or any of a thousand other uses.
Microsoft sells Office under two models: Individuals and businesses can pay for the software license up front and own it forever (what the company calls the “perpetual” version of the suite), or they can purchase a Microsoft 365 or Office 365 subscription, which means they have access to the software for only as long as they keep paying the subscription fee.
When you purchase a perpetual version of the suite — say, Office 2019 or Office 2021 — its applications will never get new features, whereas apps in the “365” subscriptions are continually updated with new features. For more details, see our comparison of the two Office models.
This cheat sheet gets you up to speed on the features that have been introduced in Microsoft 365’s Word for Windows desktop client since 2015. We’ll periodically update this story as new features roll out. (If you’re using the perpetual-license Word 2016 or 2019, see our separate Word 2016 and 2019 cheat sheet. We’ll be updating that story for Word 2021 soon, but in the meantime, check out “What’s new in Office 2021?”)
Use the Ribbon
The Ribbon interface is alive and well in the current version of Word. Since it has been included in Office applications since Office 2007, you’re probably familiar with how it works, but if you need a refresher, see our Word 2010 cheat sheet.
In September 2018, Microsoft overhauled the way the Ribbon looks, and the company has continued to tinker with the design since then. It’s now flatter-looking, cleaner, and less cluttered, and it has high-contrast colors, which makes the icons and text on the Ribbon easier to see. Some time after Microsoft released Windows 11, the company again gave the Ribbon (and Office overall) a slight facelift, so it more closely aligns with that new version of Windows. But it still works in the same way, and you’ll find most of the commands in the same locations as in earlier versions.
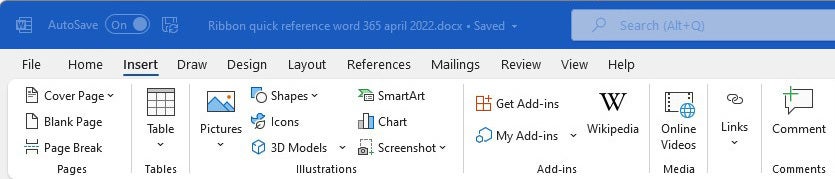 IDG
IDGThrough the years, Word’s Ribbon has gotten a variety of cosmetic changes, but it still works largely the way it always has. (Click image to enlarge it.)
The new look appears in both Windows 10 and Windows 11, but depending on your installation, it may or may not show up by default. You can check by clicking the icon of a megaphone near the top right of the screen above the Ribbon. In the Coming Soon screen that appears, look at the “Try the new experience” slider. If it’s “On,” it likely means you’re using the new interface. If it’s “Off” and you’d like to turn it on, move the slider to “On” and restart Word. That should turn on the new look. However, in my tests, changing back and forth was often flaky, especially on PCs running Windows 11.
To find out which commands live on which tabs on the Ribbon, download our Word for Microsoft 365 Ribbon quick reference. Also note that you can use the search box above the Ribbon to find commands.
Just as in earlier versions of Word, to make the commands underneath the tabs on the Ribbon go away, press Ctrl-F1. (Note that the Ribbon tabs — File, Home, Insert, and so on — stay visible.) To make the commands appear again, press Ctrl-F1. You can also make the commands on the Ribbon go away by clicking the name of the tab you’re currently on. To make the commands reappear, click any tab.
You’ve got other options for displaying the Ribbon as well. To get to them, first make sure the commands underneath the tabs are displayed on the Ribbon. Then click the Ribbon display options icon (a down arrow) at the far right of the pane that displays the commands. A drop-down menu appears with these three options in the Show Ribbon section:
- Full-screen mode: This hides the entire Ribbon, both the tabs and commands underneath them. You can make the Ribbon and tabs appear by clicking at the top of Word. That only makes them appear temporarily, so that you can choose a feature or option from the Ribbon. Once you start typing in the document, the Ribbon and tabs disappear. To make them visible even when you’re typing, click at the top of Word to display the Ribbon and tabs, click the Ribbon display options icon, and choose one of the following two options.
- Show tabs only: This shows the tabs but hides the commands underneath them. To display the commands underneath the tabs when they’re hidden, click any tab, click the Ribbon display options icon, and choose Always show Ribbon.
- Always show Ribbon: Selecting this shows both the tabs and the commands.
A fourth option that appears when you click the Ribbon display options icon is Show Quick Access toolbar. This displays the Quick Access Toolbar, which can give you fast access to a variety of Word features, like New, Save, Print, Draw Table, and many others. When you enable the toolbar, it starts off empty. To populate it, click a small down arrow that appears at the right of the toolbar and choose which features to put on it.
To customize the title bar above the Ribbon, select File > Options > General. In the “Personalize your copy of Microsoft Office” section, click the down arrow next to Office Theme and select Dark Gray, Black, or White from the drop-down menu. To make the title bar blue again, choose the Colorful option from the drop-down list. Just above the Office Theme menu is an Office Background drop-down menu — here you can choose to display a pattern such as a circuit board in the title bar.
There’s a useful feature in what Microsoft calls the backstage area that appears when you click File on the Ribbon: If you click Open, Save a Copy, or Save As from the menu on the left, you can see the cloud-based services you've connected to your Office account, such as SharePoint and OneDrive. Each location now displays its associated email address underneath it. This is quite helpful if you use a cloud service with more than one account, such as if you have one OneDrive account for personal use and another one for business. You'll be able to see at a glance which is which.
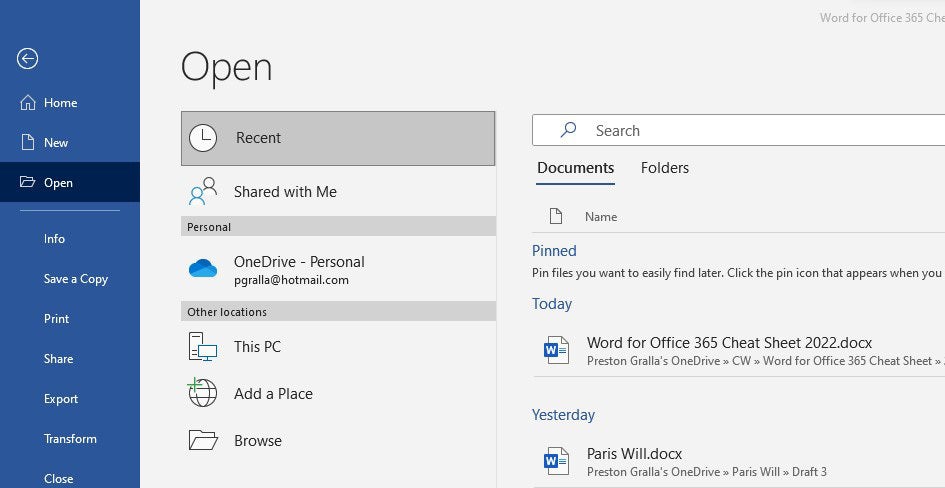 IDG
IDGSelect Add a Place on the left to add a new cloud storage service for Word. (Click image to enlarge it.)
Possibly in the works: A simplified Ribbon
Microsoft has been working for some time a simplified version of the Ribbon for all Office applications. Like the existing Ribbon, it will have tabs across the top, and each tab will have commands on it. But it’s more streamlined and uses less space than the existing Ribbon.
For now, Outlook for Windows is the only Microsoft 365 desktop app that uses the simplified Ribbon. However, you can get a preview of what it will look like in Word by going to the online version of Word. Click the Ribbon Layout icon (a down arrow) at the far right of the Ribbon and choose Simplified Ribbon to use it. To revert to the larger, older version of the Ribbon, instead select Classic Ribbon. Microsoft has made the simplified Ribbon the default in the online version of Word, so you may not need to do anything to display it.
 IDG
IDGA cleaner, simpler Ribbon will be available in Word at some point, but if you want to try it now, head to the online version of Word, pictured here. (Click image to enlarge it.)
In the simplified Ribbon, all the commands are still there for each tab, but only the most commonly used are visible. Click the three-dot icon at the far right end of the Ribbon to show the rest of the commands in a drop-down menu.
In the Outlook desktop client, you can toggle between the streamlined and traditional Ribbon by clicking a small down arrow icon at the right edge of the Ribbon. We assume this will work the same way in Word, but at this point we have no details. We’ll update this section when the simplified Ribbon rolls out to Word for Windows. It may be some time before that happens, though, because the simplified version has been in the works for years and still hasn’t made an appearance in the desktop app.
Collaborate in real time
The biggest feature that’s been introduced in Word for Microsoft 365 subscribers since 2015 is real-time collaboration. It lets people work on documents together from anywhere in the world with an internet connection, a feature that Google Docs has long had. Microsoft calls this “co-authoring.”
There are only three requirements for collaboration in Word for Microsoft 365: You must be logged into your Microsoft or Office 365 account; the document must be stored in OneDrive, OneDrive for Business, or SharePoint Online; and AutoSave must be turned on.
To share a document so you can collaborate on it with others: first open it, then click the Share button in the upper-right part of the screen. If you haven’t yet saved your file in OneDrive, OneDrive for Business, or SharePoint Online, you’ll be prompted to do so.
Clicking the Share button pops up the “Send link” window. Here you can send an email with a link where others can access the document.
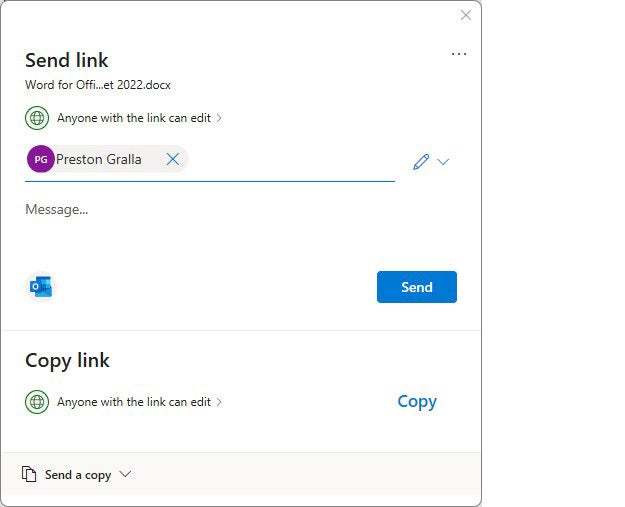 IDG
IDGSharing a document via the “Send link” pane. (Click image to enlarge it.)
First, decide whether anyone with a link can edit the document, or only those whose email addresses you enter. If you see the text “Anyone with the link can edit” near the top of the pane, you can change that by clicking it, then choosing Specific people on the screen that appears. Similarly, if “Specific people” appears above the email addresses, you can change that by clicking it, then choosing Anyone with the link can edit from the screen that appears.
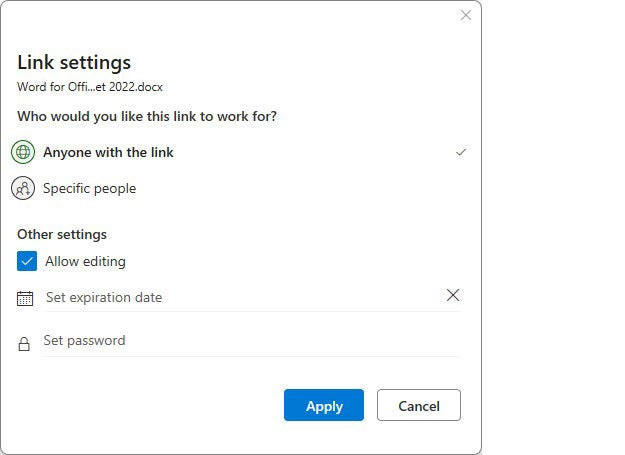 IDG
IDGYou can fine-tune access and editing permissions for your document here. (Click image to enlarge it.)
On this second screen you can also uncheck the Allow editing box to set the document to read-only for everybody. You can also set an expiration date after which people won’t be able to access the file. And you can set a password so that only people who have the password can access it. (If you use a business, enterprise, or education edition of Office, you may have slightly different sharing permissions and options set up by your IT department, such as an option to allow anyone within your organization to edit the document.)
Back in the main “Send link” window, enter the recipients’ email addresses (as you type, Word will suggest people from your address book whom you can select), optionally type in a message, and click Send. An email is sent to all the recipients with a link they can click to open the document.
(If you’d rather send recipients a copy of the file as a Word document or PDF rather than a link, and thus not allow real-time collaboration, click Send a copy at the bottom of the “Send link” screen.)
There’s another way to share a file stored in a personal OneDrive for collaboration: At the bottom of the “Send link” window, pane, click Copy link. When you do that, you can copy the link and send it to someone yourself via email. Note that you have the same options for allowing editing, not allowing editing, and so on as you do if you have Word send the link directly for you. Just click Anyone with the link can edit or Specific people below Copy link, and follow the instructions above.
To begin collaborating: When your recipients receive the email from you, they click a button or link to open the document, which opens in Word Online in a web browser rather than in the Word desktop client. They can either edit or read it in Word Online, depending on the permissions you granted, or click Open in Desktop App and use it from the Word desktop client.
The web version isn’t as fully featured as the client version — for instance, there aren’t as many formatting options and you can’t insert shapes, take screenshots, use mail merge, or use several other features. But for basic editing, it works fine.
When any collaborators open the document, you’ll see a colored cursor bar for each person that indicates their presence in the document. Each person gets their own unique color. Hover your cursor over anybody else’s cursor bar to see their name. Once they begin editing, you can see what each collaborator does as they do it, including deleting, editing, and adding text. They see what you do as well.
 IDG
IDGYou can see other collaborators’ edits in real time, with a different colored cursor for each collaborator. (Click image to enlarge it.)
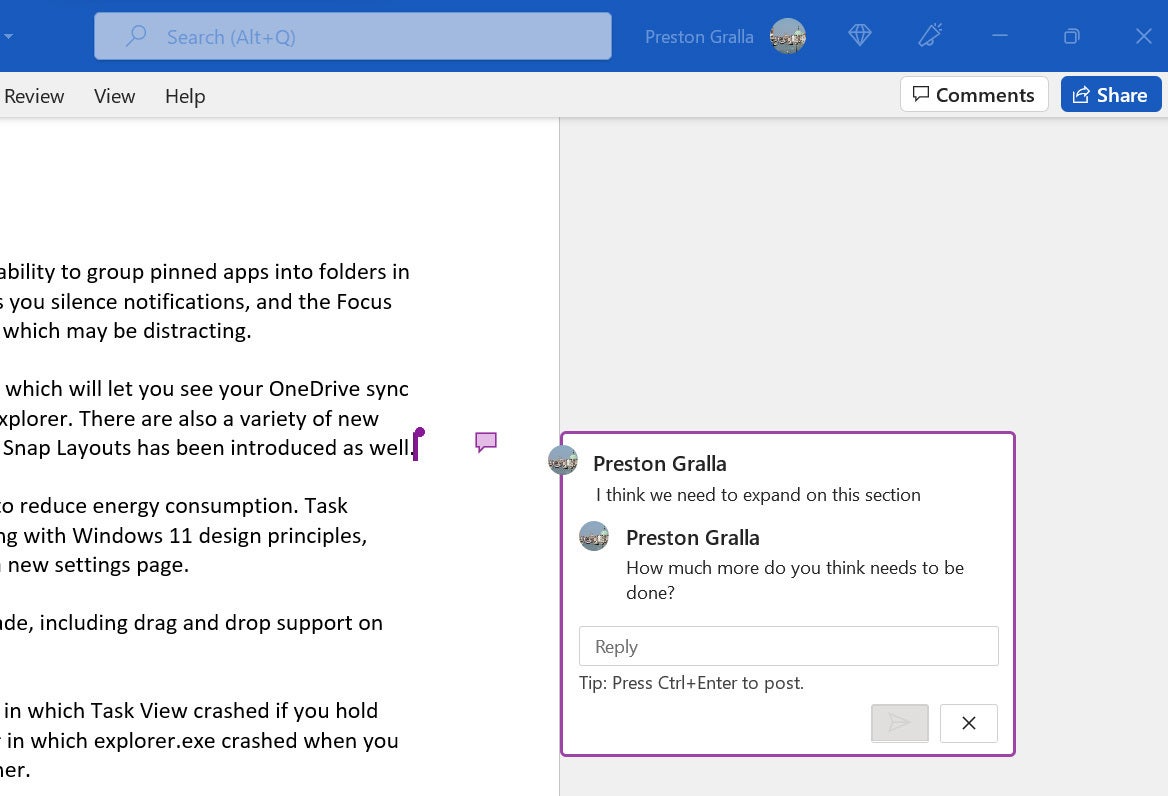
Collaboration includes the ability to make comments at specific places in a document without actually changing the document’s contents. To do it, place your cursor in the document where you want the comment to appear (or select a word or phrase), click the Comments button in the upper right of the screen and select New Comment. A new comment box appears in the right margin; type in your comment there.
If you want to draw a colleague’s attention to a comment, @ mention them in the comment — type @ and the first few letters of the person’s name, then choose their name from the list that appears. They’ll receive an email notification with a link to the comment in the document.
Everyone collaborating can see all comments in the right margin. To reply to a comment, hover over it, click the Reply button, and type your response. There’s also a Resolve button that grays out the comment.
 IDG
IDGTo reply to a comment, hover over it, click the Reply button, and type your reply. (Click image to enlarge it.)
Be aware that how well real-time collaboration works depends on the strength of your internet connection. On slow or flaky connections, you won’t immediately see edits that other people make and they won’t see yours immediately — there will be a lag. So it’s always best, when possible, to have the strongest connection possible when collaborating.
At any time, you can see who has access to the file by clicking the Share button. In the “Send link” screen that opens, click the three-dot icon in the upper right and select Manage access to see a list of people who can access the file. Here you can change edit/view permissions, revoke someone’s access, or remove the sharing link altogether.
Search to get tasks done quickly
A very useful addition to Word 2016 was called Tell Me — basically, an enhanced search feature for finding commands in Word. Now renamed simply Search, it’s extremely helpful when you want to do a task that you haven’t done before or have forgotten how to do.
To use it, click in the Search box — it’s above the Ribbon in the blue title area. (Keyboard fans can instead press Alt-Q to go to the Search box.) Type in a task, and you’ll get a list of possible matches. Click the task you want to get instructions on how to do it.
For example, I typed address an envelope and chose the Envelope result, and the screen you use for addressing envelopes appeared. When I typed in the more general query write an essay, it popped up a link to Word’s Researcher feature that lets you do research from within Word, add sources from the research you find, and then cite the sources in the document. (More on Researcher in a moment.) If you type in a query and hover your mouse over a result instead of clicking it, you’ll see a screen describing what you can do if you click the results.
 IDG
IDGThe Search box gives advice on addressing an envelope (or any other task). (Click image to enlarge it.)
It’s a big time-saver, because you don’t have to hunt through the Ribbon to find the command you want. And it remembers the features you’ve previously selected in the box, so when you click in it, you first see a list of previous tasks you’ve searched for. That way, tasks that you frequently perform are always within easy reach.
Search is gaining more capabilities, too. Some users of enterprise and education editions of Microsoft 365 are now able to use the Search box to find people in their organization, SharePoint resources, and other personalized results from within Word.
